Using Canon dSLRs for AstroImaging. |
|
Introduction
This short article is meant as an introduction to using a Canon dSLR camera for AstroImaging. It covers the following:
- Which camera?
The pros and cons of some of the various Canon dSLRs.
- How to set up your camera for imaging.
The kit required, how to put it together, which telescopes, light pollution, focussing...
- Two setups.
A stand alone option (no PC required) and a PC controlled fully automated option.
This article is not intended to cover processing though there is a short section on organising and planning a basic imaging run and a bit about the sort of software you will nedd and what is available and some links to some tutorials etc.
Which Canon dSLR...
A brief summary of a few of the available cameras and their pros and cons.
Attaching the camera to a scope...
Which scopes are best and attaching your camera.
A Stand-Alone setup (no PC required)...
An example of a stand alone setup.
A PC Controlled setup...
My observatory setup.
|
|
|
|
|
Which Camera...

|
|
Over the years, Canon have been a market leader in all types of professional and semi-professional cameras. Since the introduction of the digital SLR, Canon has been the choice of the professional. Canon make a very broad range of dSLRs aimed at anyone from the keen amateur, attempting to take his or her photography to the 'next level' right up to large format, fast shutter repeating professional sports photographers cameras.
When considering a camera for astroimaging, we have a few basic requirements which differ from what may be best suited for high resolution daylight photography - in terms of astrophotography, really the most important thing to think about is the sensor, though some other factors should be considered as well. Factors I will consider include:
- Sensitivity and resolution
- Low noise
- A genuine 'RAW' file format
- Fast communications
- A good response across the whole visible spectrum
Factors similar in all models.
All Canon cameras use a genuine RAW format. RAW is simply a way of storing exactly what the camera's sensor 'sees' without any post capture processing - one draw back of Nikon cameras is that noise reduction routines (to remove hot and dead pixels and a general noise reduction) are still applied to RAWs. So this is not a consideration when selecting amongst the various models that Canon offer.
Canon have (not too suprisingly) improved their sensors meaning that in terms of noise, the newer the camera model, the less ambient noise their is. To a degree, this advance is countered by packing more pixels into the same area but it stands as a good rule of thumb to say that the more up-to-date a camera is, and the more expensive the camera is, the less noise you get from the sensor. As I say though, packing in more pixels can increase noise, but more about this in a minute.
|
|
Response across the visible spectrum in Canon's cameras is quite similar - some advances have been made, but generally speaking, it's not unreasonable to talk about the cameras as a group. CMOS sensors in Canon cameras have a general increase in sensitivity towards the red end. For daylight photography this is a disadvantage as a reasonable daylight balance has to be achieved using a white balance function and in RAW mode (which doesn't apply a white balance) by the use of a physical filter which blocks unwanted (and unfocussed) UV and IR light as well as reducing the amount of red light passed thereby giving a 'true' daylight balance.
For the best balance for astroimaging where red light is less energetic, we need to use all of the cameras available sensitivity across the range of frequencies of the visible electromagnetic spectrum. This is why, for astrophotography, we remove the standard UV/IR blocking and anti-aliasing filter and replace it with a UV/IR blocking filter that cuts off very sharply at the limits of the visible spectrum. This can increase a camera's sensitivity to red light (including the all important Hydrogen Alpha band - the light from red emission nebulae) by as much as 5 times. In practice, this can mean that as much red light can be gathered by a modified camera in one minute as an out-of-the-box standard camera in 5 minutes. This varies across the models, but in all cases, the improvement is significant.
This leaves us with two factors, fast communications and sensitivity and resolution
Fast Communications.
This is important for a couple of different reasons. If imaging using a PC or laptop and downloading shots as you go, it's preferable to allow the camera a reasonable cool-down time between shots - a warm sensor means an increase in electro-thermal noise or noise caused by heat due to the electronics of the camera. A lot of electronic components heat up when in use (including sensors themselves) and a good idle time between shots (between 30 and 45 seconds depending on ambient temperature) can improve the quality of shots significantly. If a camera's communication electronics is running for half of this time, then heat inside the camera does not dissipate so readily. Secondly, if saving shots to a CF card then later downloading them to your PC, then download can take considerably longer.
The difference between the models is that some use USB1.1 and others use USB2.0. The speed difference is 12Mbps (Mega bits per second) vs 480Mbps - this is 40 times faster, but is a maximum measure of the speed available under the standard and note a true measure of the speed difference. A lot of other factors come into play - other devices attached to the USB bus (even some devices internal to the PC or laptop), the connected device's true maximum (i.e., flash drives have a maximum of about 240Mbps). The whole speed thing is a bit of a minefield - MBps is not the same as Mbps (Mega Bytes vs Mega bits - 8 bits in a Byte so multiply MBps by 8 to give Mbps) and Full-Speed USB is not the same as Hi-Speed - Full-Speed is 12Mbps USB 1.1 and Hi-Speed is USB 2.0. Also 'USB 2.0 Compatible' does not mean that it is USB 2.0. Anyway - this page - - should answer some of your questions.
So, importantly, which camera is what?
- D60 - USB 1.1
- 300D - USB 1.1
- 10D - USB 1.1
- 350D - USB 2.0
- 400D - USB 2.0
- 450D - USB 2.0
- 1000D - USB 2.0
- 20D - USB 2.0
- 30D - USB 2.0
- 40D - USB 2.0
So - since the 350D and 20D, Canon has used USB 2.0
Sensitivity and Resolution.
Firstly, a note about sensitivity. A pixel of double the surface area, made of the same material having the same substrate and operating using the same electronics will have twice the sensitivity of one half the area. What this means in practice is that for AstroImaging, squeezing more pixels into the same area is not a good thing as it reduces the sensitivity of individual pixels.
The following shows the sensor size and number of pixels for the Canon 300D, 400D, 450D, 1000D, 20D, 40D cameras.
| Camera |
Sensor Size |
Pixels |
Pixel Size |
| 300D |
22.7 x 15.1 (mm) |
6.5 million (total) |
7.1 micron |
| 350D |
22.2 x 14.8 (mm) |
8.2 million (total) |
6.4 micron |
| 400D |
22.2 x 14.8 (mm) |
10.5 million (total) |
5.7 micron |
| 450D |
22.2 x 14.8 (mm) |
12.4 million (total) |
5.2 micron |
| 500D |
22.3 x 14.9 (mm) |
15.5 million (total) |
4.2 micron |
| 550D |
22.3 x 14.9 (mm) |
18.7 million (total) |
4.7 micron |
| 20D |
22.5 x 15.0 (mm) |
8.5 million (total) |
6.4 micron |
| 40D |
22.2 x 14.8 (mm) |
10.5 million (total) |
5.7 micron |
| 50D |
22.2 x 14.8 (mm) |
15.5 million (total) |
4.7 micron |
|
|

|
OK - so what does this all mean? Canon say that when comparing the 350D to the 400D, the 400D still performs well at higher ISO settings because it's pixel 'fill' is better - the sensitive pixel material comes closer to the edge of the pixel. In practice though, photographers have found that the 350D can produce sharper images, so it's a trade off - what's more important - more pixels or better sensitivity? That is really a question for you to answer - the 8 megapixel 350D produces high quality A4 images - if you want larger images than this, then no doubt the 400D is worth considering, but if improved sensitivity is more important, then of the two, perhaps the 350D is the camera for you.
To confuse matters still further, with the introduction of the 450D, 500D and 550D pixel fill has improved even further and certainly these models now show very good sensitivity and with other improvements in the cameras like 'gapless microlens' technology (which reduces the gaps between pixels, introduced in the 550D) they are all well worth your consideration.
Other Factors.
There are a few other important factors to consider when choosing a Canon dSLR such as ISO settings - some are capable of ISO 3200, 'Live View' - the 40D, 450D and 1000D and of course, cost.
So, briefly, ISO 3200 - this is rarely of much use. ISO 3200 tends to be quite noisy and using firmware hacks is available to most models anyway. For myself, I mainly use ISO 400 and 800 and very rarely, ISO 1600. Personally I consider that ISO 3200 has no additional advantages.
Live View combined with larger LCD screens is a real bonus as it makes sharp accurate on-camera focussing far easier meaning less time is spent either grovelling around in the dirt taking shots and adjusting focus after previewing the image or going backwards and forwards between 'scope and laptop. I believe this is a big step forwards in recent canon cameras. Also, I have heard of people that have used the outputted live view info to record AVI movies of planets which are then suitable for stacking giving good planetary shots.
Cost for most people can be a defining factor and the cost of the various models varies quite widely.
For a good comparison of new camera prices, visit http://www.camerapricebuster.co.uk/cat1.html.
Recommendations.
Astronomiser recommends the following cameras:
- Canon 1000D
Good sensitivity, lots of pixels and Live View - personally, I think this camera has picked up where the 350D left off - a great camera at a great price, highly recommended.
- Canon 500D
Lower noise than the 1000D, solidly constructed and plenty of pixels a great performer without breaking the bank.
- Canon 40D
A flagship camera in all senses - a superb camera for astronomy with lots of advantages - highly recommended.
NOTE: Astronomiser can modify any model of Canon dSLR Camera. For a discussion of the latest models and to get our latest recommendations, please call me on 07709490738.
|
|
|
Attaching the camera to a scope...
This section will give you a brief explanation of what you need in the way of telescope and mount, and hardware to attach the camera to the scope.
Telescopes and Mounts.
Firstly, I'm going to talk about the mount. A good mount is perhaps the most important and most overlooked piece of equipment when starting in AstroImaging. Good tracking is ultimately important as cameras will see movement undetectable to the eye - even if a star seems to remain centred in a medium power eyepiece, small variations in the mount's gears (periodic error) or slight tracking errors will be picked up.
The best solution is to get a good heavy weight mount such as a SkyWatcher HEQ5 or EQ6 Pro, Losmandy G-11 with Gemini, any AstroPhysics mount or mounts such as the Software Bisque Paramount and then to use autoguiding to correct any remaining errors. I use an EQ6 Pro and autoguiding.
Another possible solution to the whole issue is to use a Astrotrac in combination with high quality camera lenses. This does away with the need for a telescope and is a superb piece of kit which is also portable.
As to telescopes, not all are suitable. Classic Newtonian reflectors rarely have enough in-focus to cope with a dSLR which has it's sensor set back a fair way into the camera's body (44mm in the case of the 350D). Photo-Newt's are designed with this in mind. Any Catadioptric scope (i.e., Meade LX200) or refractor will be OK on this score.
|
|
|
|
|
The next thing you will need to consider is 'field of view' - this is directly related to the scope's focal length - aperture and focal ratio do not effect field of view. Field of view essentially means how wide an angle the shot is. A long focal length (i.e., an F10 8" scope at 2000mm) will give a very small field of view - with the same camera a 500mm scope will give 4 x the width. For large nebulae such as NGC7000 the North American nebula and the Veil Nebula a scope around 500mm is ideal.
|
|
For smaller objects like M82 the Cigar Galaxy a longer scope is better.
Another consideration is how 'fast' the scope is. This is a balance between focal length and aperture know as f-ratio. For AstroImaging, the faster a scope is (the lower the f-ratio) the quicker it will capture an image. Ideally you should aim for around f5 - my scopes are f6.25 and f6 - this is about as good as you can expect to get and still have all frequencies of light brought together with the same focus (known as 'apochromatic'). Scopes such as meade SCT scopes can use 'focal reducers' to achieve this.
Other factors include 'flatness of field' (is the camera's sensor going to be equally illuminated all the way across?), coma (are stars towards the edge of image going to be round), vignetting (caused by things such as using too small a focuser adapter or filtering with 1 1/4" filters, the scope's ability to hold the weight of a camera and a 2" focusser or SCT attachment are a must-have.
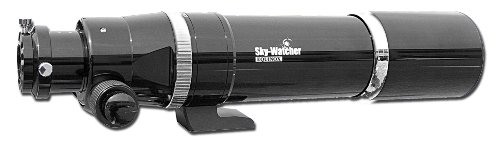
To begin in AstroImaging, I would recommend a good fast apochromatic refractor such as the SkyWatcher Equinox 80, a William Optics ZS80 FD or similar and a SkyWatcher HEQ5 or EQ6 Pro mount - you can later add a larger scope and then autoguide.
Attaching the Camera.
This is a relatively simple operation, but you will need a few adapters and may need to use extension tubes, depending on the amount of out-focus (movement of the focusser away from the scope's body) your telescope has.
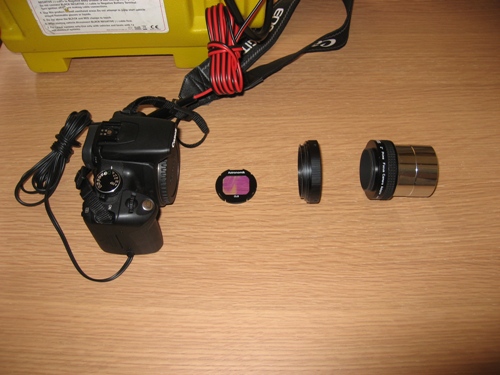
The below picture shows the parts needed to attach a camera to a scope with a 2" focuser - if your scope has an SCT focusser then you will need different adapters.
|
|
|
From left to right:
- Canon 350D Camera.
- Astronomik CLS Clip Filter.
- EOS to T adapter
- T to 2" adapter
A light pollution (LP) filter is essential if you have any light pollution (from street lights etc) at all - the type shown is an Astronomik EOS clip filter which fixes into the camera's front recess. These can be purchased from most good astronomy retaillers and cost around �100 - an alternative is a 2" LP filter which will screw on to the front of the T to 2" adapter, these cost around �125
EOS to T adapters are made by lots of different manufacturers (the one shown is a celestron) and can again be purchased from most good astronomy retaillers for around �15. This simply fits to the camera in place of the lens and gives a standard female T thread which allows you to attach standard accessories (i.e., focuser adapters, filter wheels, some focusers, some reducers etc)
A T to 2" adapter fits to this - the one shown is an Antares T to SCT female to SCT male to 2" focuser - this type allows you to couple in a standard SCT focal reducer, i.e., Meade or celestron f6.3 reducer. This particular model is hard to get hold of, but standard T to 2" focusser adapters are once again widely stocked and cost around �17.
|
|
These parts simply connect together and the camera slides into a 2" focusser.
If your scope does not have a 2" focusser, you will need either a T to SCT or T to 1 1/4" adapter, again available from the usual sources. If your scope has an 1 1/4" focusser then the sensor of the camera will not be equally illuminated across it's whole surface leading to vignetting and you will need to trim the edges from any images you capture.
|
|
|
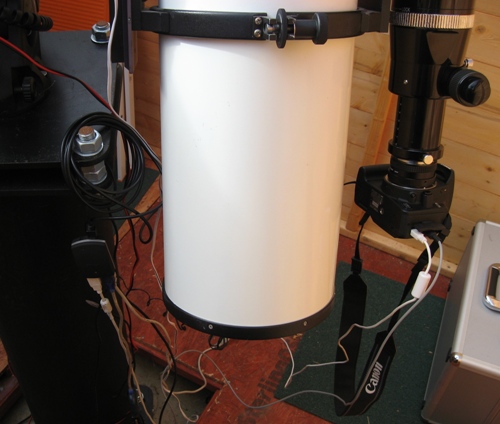
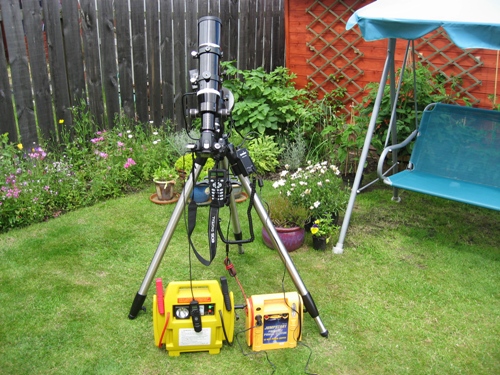
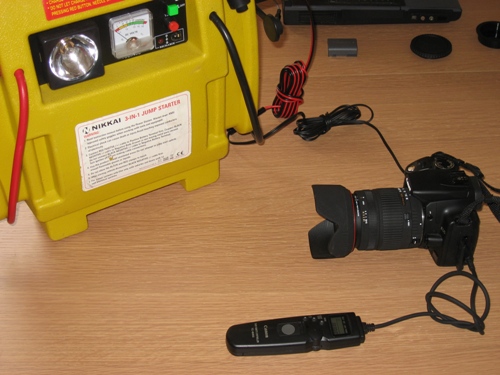
A Stand-Alone setup (no PC required)...
|
|
|
Unfortunately, this pictures makes the setup look a little complicated, but it's not.
The mount is a SkyWatcher EQ5 Pro which, with a good polar alignment, can manage exposures of around a minute or so with the Equinox 80. This mount can be autoguided if required and has a standard SynScan version 3 handset fitted which has a good object catalogue and fast slew speeds making it a full 'GoTo' mount.
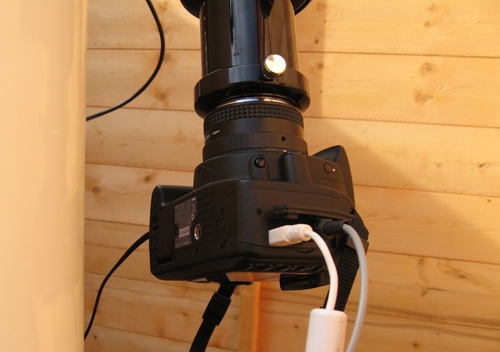
If you remove the scope and mount, then you can see that all you are left with in this second picture is very much more straight forwards. The camera is powered by an AST350DDC power adapter (no longer manufactured) which plugs in in place of the camera's battery and an adapted TC80-N3 timer remote control.
|
|
Though there are lots of methods to get a good focus, I have put cross hairs over the objective lens of the scope - the dew shield has a plastic end that can be unscrewed allowing it to be drawn back past the end of the scope, then two pieces of black cotton are crossed over and insulation tape is used to hold them in place. I then roughly focus the camera on a bright star through the viewfinder and take a quick shot of it, maybe a second or two. Then I zoom in on the shot using the camera's preview. When the diffraction spikes from the star are single and nice and sharp, the camera is focussed. It's worth making a small mark on the focusser tube with a permanent marker, or in the case of a focuser with gradations, like the equinox, simply right down the value.
The camera is set to manual and bulb and a suitable ISO setting is chosen, I normally use ISO800 for shorter exposures. Also, it is best to set the image quality to RAW so that no in-camera processing takes place - to import these images onto your PC you may need a CR2 plug-in from your software provider.
After focussing and setting the camera, you will need to program the timer remote. I start with a delay of 30 seconds to allow me to get away from the mount, scope and camera and to allow any vibrations to settle down. You then need to set the interval between shots - I use 45 seconds to allow the camera to cool down between shots. Next is the exposure length - I usually start with 1 min at ISO800 with this setup and try a few at 2 mins later. Finally you should set the number of exposures required - I usually take upwards of 20 at this timing and ISO.
|
|
|
|
...And that's about it - you will need to stack and refine the images you've taken, but that's a whole new tutorial.
|
|
|
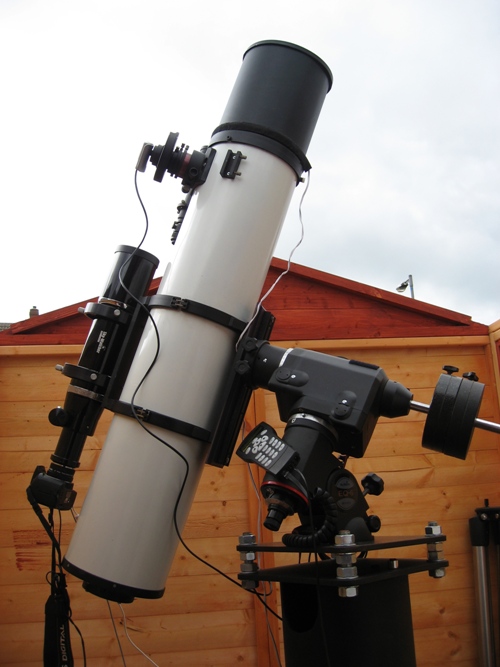
A PC controlled setup...
|
|
|
This setup is far more complex, but taken in two parts, is relatively straight forwards to duplicate. Even if the components of the setup are altered, the underlying principles remain the same.
The two jobs this rig does are:
- Autoguiding
- Camera Control
USB communications are an important part of this setup - few modern laptops support either serial or parallel communications so signals are converted to USB and details of how this is done are covered in the below sections
|
|
Autoguiding
Autoguiding is a huge, involved and important part of AstroImaging and this article is not aimed at giving in-depth knowledge of autoguiding, so I'll keep this section brief.
Autoguiding in this case is done by taking images from a black and white long exposure modified webcam (attached to the white Intes Scope at the top of the picture above - there is also a filter wheel attached) - normally one two second image every two seconds. The image is then checked using guiding software (I'm currently using GuideDog) to see if the guide star has moved and then an adjustment is sent back to the scope.
The camera is connected using it's standard USB connection and a parallel connection through a Parallel to Serial to USB converter into a USB 2.0 hub - the two left most connections below (one is concealed behind the other).
|
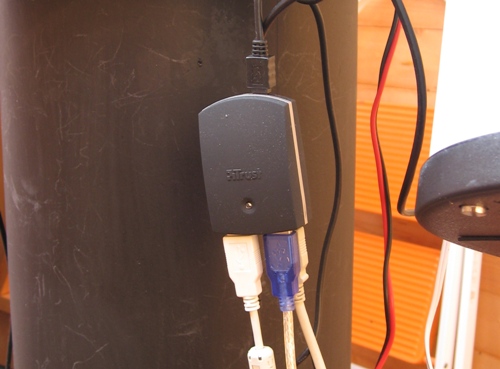
|
|
The USB hub is connected to a laptop in the warm room of the observatory by an active USB extension cable.
The software/ laptop sends adjustments back to the mount using a SkyWatcher Mount Control cable which is connected to the laptop via a USB to Serial adapter using an ASCOM driver. The cable connects to the centre of the base of the SynScan handset and can be seen in the image at the top of this section.
|
|
Camera Control
I'm going to split this section into three parts - connections to the camera and camera settings, linking these to the PC or laptop and a brief breakdown of the function of the software - I'll not be going into detailled instructions on using the software, just a brief outline of what it does - there are a lot of software choices, I use dSLR Focus, but there are plenty of other options, so to go into details of how one operates would be pointless.
Connections to the camera and camera settings.
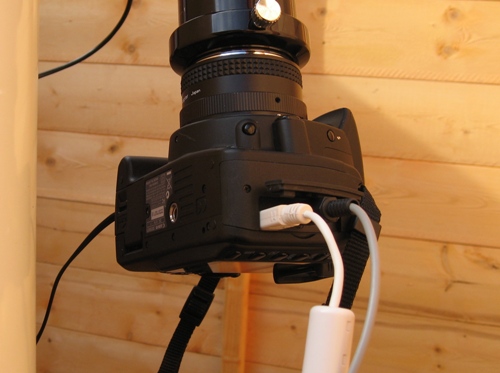
Plug in the battery adapter if you are using one.
The below picture also shows the other two connections, a serial control cable and the USB cable supplied with the camera.
|
|
|
Both connections link to the USB 2.0 hub shown further up the page (the two connections on the right). In the case of the camera's USB cable, a short USB extension is used. The serial control cable is linked using an FTDI USB to Serial adapter. As stated above, the USB 2.0 hub links back to the PC using an active USB extension cable.
There are quite a few settings on the camera that can be changed, for instance turning off the post-exposure image preview, but I'm only going to include those that I consider essential. It's worth looking through the camera's functions and deciding which ones you would like to change.
The camera can simply be set to manual and bulb. ISO and image quality can be set from most software, but if the software you have chosen doesn't support these options, then choose a suitable ISO setting - I normally use ISO400 and ISO800 - and set the image quality to RAW so that no in-camera processing takes place - to import these images onto your PC you may need a CR2 plug-in from your software provider.
|
|
Linking to your PC or laptop
At this stage you might be wondering why there's a section specifically dedicated to this as I've already explained about using USB to Serial adapters and how they link in to a USB 2.0 hub and thereby to your PC or laptop, but (as with all things astronomy) it isn't that simple. Having said this, the below process is normally just something you will need to go through once - as long as you take care to always plug things in in the same way, the settings chosen won't change.
For your software to operate correctly, you'll need to identify the COM port that is being used for specific tasks and take into account other considerations such as prioritising particular equipment and bandwidth.
For example; when using a webcam, it uses quite a lot of bandwidth when downloading a frame from the camera and if this fails during a guiding session, your guiding software may freeze and stop working giving you an unguided frame and rugby ball shaped stars. Another possibility is that a device attached to your USB ports may stop working and could cause your computer to stop operating (or hang).
So it's best to give priority to certain things and avoid bandwidth use where you can. For instance, if you save images to your hard drive during an imaging session, if your dSLR is given priority for this operation, it may take all of your available bandwidth and cause guiding to fail.
But it's not as bad as it sounds - prioritising is relatively straight forwards. You need to decide which device needs to have priority and connect that device first, i.e., if you are using a webcam for guiding, it should be given priority over other devices - a break or slow-down in the downloading of an image from your dSLR won't stop the image from downloading, it will just make it take a second or two longer, so if you are using a USB guide camera, connect it first.
For my setup, I follow this process:
Connect the guide camera - this is generally the most important factor - guiding has to be kept operational - the camera sends a frame every 2 seconds and sends adjustments to the mounts at the same regular intervals. So when you first connect up - plug the USB 2.0 port in to your PC, wait until it is detected and installed, then plug in your guider. In the case of a webcam, connect the serial to USB adapter first. The PC will 'see' this and give it priority (downloading a frame can absorb a very short delay, but exposure communications with the camera must get through when the commands are sent). Next you will need to identify the port used for this communication.
- Click 'Start' and select 'Control Panel'
- If the view in Control Panel is 'Category View' select 'Performance and Maintenance' then 'System'
- If the view in Control Panel is 'Classic View' simply select 'System'
- Click on the 'Hardware' Index Tab and then click the 'Device Manager'
- Under 'Ports (COM & LPT) your computers ports are listed
- One of these will show a value for your serial to USB adapter
These instructions are for Windows XP, but the process is very similar for Windows Vista.
You can use the 'advanced' button to change the assigned port number, but you should be careful as some ports are 'reserved' for internal hardware - try setting your software with the existing port number before changing that value - values such as COM 5, 6, 7, 8, 9 are normal and usually not taken by other devices, regardless of what your PC says.
Next, plug in other connections to your guide camera, i.e., in the case of a webcam, connect the cameras other USB connection - wait until the camera is detected and connected. At this point you can open your guiding software, set the COM port value obtained by following the above instructions and test that your camera is working properly.
Next is your output cable - the mount control cable - if using a USB to Serial adapter then connect this first, then plug your cable in to the adapter. Check that the software has established communications with your mount.
Now it's time to connect your dSLR camera - it should have to lowest priority on bandwidth - if an exposure starts a few seconds late it won't matter much and if the download of the image takes a few seconds longer again, this is unimportant - most up-to-date laptops and PCs will have enough bandwidth to cope but as I have stated before, it's important to prioritise.
Again, if using a USB to Serial adapter then plug that in first and identify the port it is using following the above instructions.
Once identified, set this value in your dSLR control software. Finally, plug in the camera's USB cable.
That's it - you're now ready for imaging.
Using dSLR control Software.
This final section is going to be short - there's a lot of software out there that you can use to control your camera, so rather than going into detail of how this is done, I'm simply going to talk about the standard functions that are available in this type of software.
Firstly, take care when choosing your software - not all models of Canon dSLRs are supported by all software. Canon use a processor called 'Digic' - different models have different versions of this processor from Digic I to Digic III and different drivers are needed for the later Digic III so it is not supported by all software.
The following is a list of some of the popular models of Canon cameras and the processor used:
- 300D - Digic I
- 350D - Digic II
- 400D - Digic II
- 450D - Digic III
- 1000D - Digic III
- 10D - Digic I
- 20D - Digic II
- 30D - Digic II
- 40D - Digic III
dSLR software normally carries out the following functions:
- Adjust the cameras settings, i.e.,
- ISO
- image quality and size
- Set exposure times
- Set gaps between exposures
- Set numbers of exposures
Normally, you can use the software to aid focussing - take a quick low quality image at high ISO of a star and set the focus until the image is as pin-point as possible. This speeds up the focussing process and gives more accurate focussing than any achieveable by just using the camera by itself.
Once you have got a good focus, you can set the software to take a series of images and even change ISO and exposure time part way though. Personally, for most nebulae, I set the software to take 12 5 minute exposures at ISO 800 spaced by 45 seconds, followed by 6 10 minute exposures at ISO 400 again spaced by 45 second intervals. I set the software to save the images directly to my laptop so I can both see the results as they happen and start on processing.
A note on Darks and Flats.
A dark shot is a shot taken with the telescope's end cap still on, under the same condition as the main images, i.e., from the above, a 5 minute shot at ISO 800 and a 10 minute shot at ISO 400 could be used. They then show up all of the camera's internal noise both from heat of the sensor (electro-thermal noise) and bright pixels. They are used during processing and can be 'subtracted' from your images to remove noise.
Flats are produced by taking a shot of a well lit white surface and show the impact of any dirt on the sensor or variations in illumination of the sensor. You use these by 'dividing' the image by the flat in your processing software.
So how useful are they? This shot:
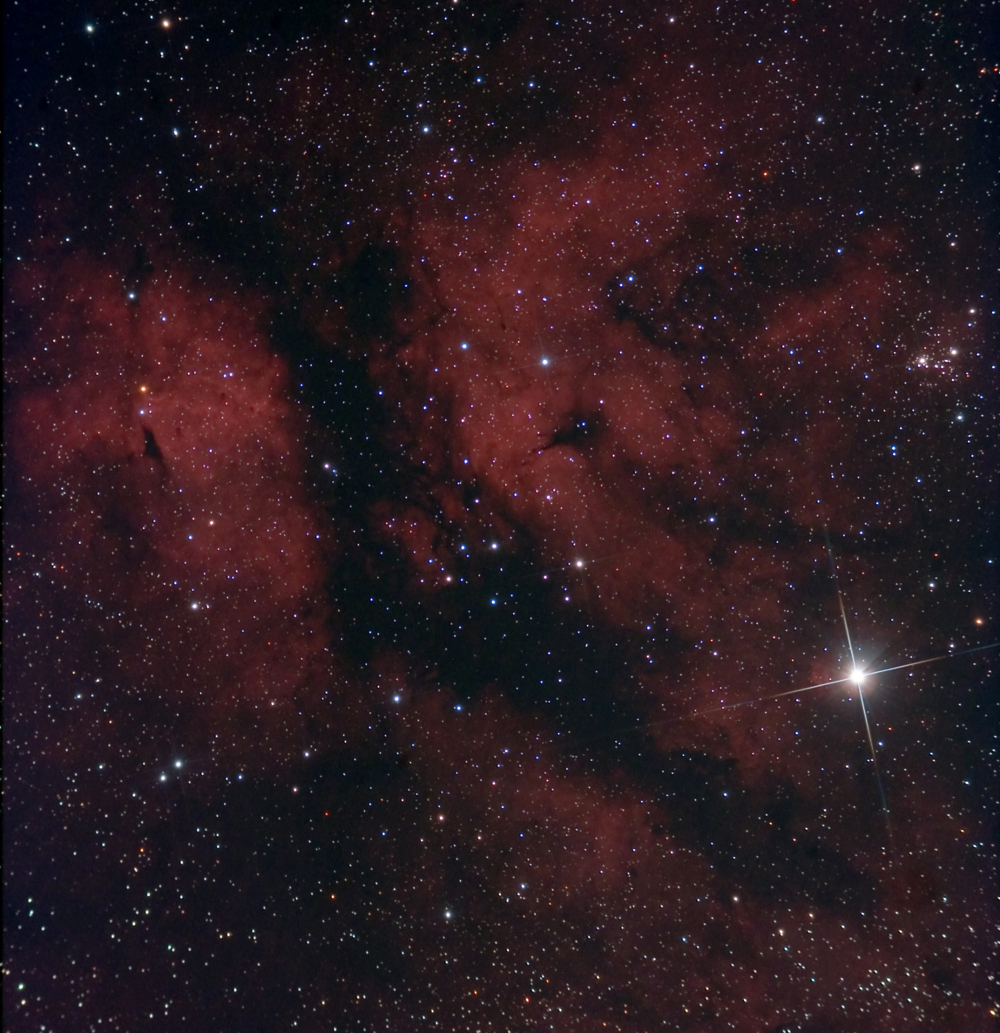
was taken without using flats or darks, so perhaps you can get away without them at all. Having said this, darks are useful for cleaning up noise in shots that may have to be stretched quite hard during processing and flats are useful if the sensor surface is marked or damaged.
Andy Ellis, July 2008. NOTE: All details are correct at the time of writing, but please check other sources if you are unsure. I will accept no responsibility for any actions taken following the advice in this document.
|
|


